Request for Access to Links

There was a recent update that has caused my Google Doc links to stop working. Please send me a request for access to the files until I can get them up and running again. I will grant you access through the email as soon as I am able to, thank you!

7.31.2011

A NEW Ice Cream Flavor and July Thank You's

In case you haven't seen this in your grocery store yet, I wanted to introduce you to a new flavor of ice cream...Triple Chocolate Cake ...my new favorite.


Really I think it should be called Triple Chocolate Fudge Brownie because it tastes more like chewy fudge brownies mixed in with swirls of hot cold fudge sauce than cake pieces and frosting.  It's pretty good, have you tried it?

So what's your favorite flavor of ice cream this summer?  


July Thank You's

Each month I like to feature the bloggers that have spotlighted one of my projects.  It's just a small way of showing my appreciation.  If you see any sites that you're not familiar with and would like to pay them a visit, the links go directly to the home pages.

Patriotic Subway Art

Paint Stick Crate

A New/Old Door
Funky Junk Interiors-Facebook feature

Father's Subway Art

Burlap Wreath
Funky Junk Interiors-Facebook feature

Summer Subway Art

Americana Quick Change Frame

Strawberry Jam Printable Labels/Tags

Cardboard Box Train Costume

Thanks a bunch!

If you featured one of my projects in July and don't see a link to your blog on the list, please send me an e-mail so I can add a link to your home page.

 
Today's Fabulous Find...Triple Chocolate Cake Ice Cream!

Pin It!

7.28.2011

Hanging Heavy Windows, Doors, and Frames

When I was ready to hang my door on the wall, I realized that it wouldn't work to hang it with a picture wire because the wire would be seen through the glass.  The door only measures 18" x 36" but is still plenty heavy, so hanging it from a couple of nails in the wall was just not going to cut it this time.  Also, with young children in my home I wanted to be sure it would stay put once it was hung, I don't want it falling on anyone.

I bought these large flush mount hangers at Lowe's to try, it cost around $4 for two sets.

(I remembered to take a picture after the fact, there are 2 sets in a package.)

My stud finder didn't show any 2x4 studs in the wall where I needed to position the hangers, so after using a level to mark the positions, I went ahead and installed the hangers onto the sheetrock.   *It's always best to find a 2x4 stud to install them onto or use drywall anchors

Important note:  The screws that come in the package are too short to use on the wall side.   You will need to replace them with screws long enough to go through the thickness of the sheetrock and well into the 2 x 4 stud.  (I used black drywall screws.)

Also, it's okay to start the screws into the wall with a power drill, but I recommend finishing them by hand using a screwdriver.  If they are installed too tight it will strip the threads just made in the wall and the screws won't be secure.  (If the screw turns freely in the wall, you'll know that you went too far and will need to use a drywall anchor.)

In this situation, with 8 drywall screws holding the weight of this particular door, it's secure.  I'll keep an eye on it to see if it becomes loose and will add drywall anchors later if needed.


Line up the two hangers and slide the door/window down into place so they interlock.


You can see in this picture how close the door is to the wall.


Another plus with using the flush mount hangers is that the door/window/frame can't be pushed from side to side.  Once it's hung you never have to straighten it again.  Less work, less worry!

If you have a great technique for hanging heavy windows, doors, or frames, please share it with us in a comment.  I'd love to hear what works for you!

Today's Fabulous Find...Large Flush Mount Hangers

Pin It!

7.26.2011

Featuring: {Bless This Home} Frame w/Beadboard

Andy at Poppies at Play knows how to find a great bargain and continually has one fantastic idea after another, like this one. 


She used a yard sale frame, a scrap piece of beadboard from the clearance bin at Home Depot (you won't believe how much she paid for it) and her amazing ability to make something from nothing to create this.   

My list of things I want to make just got bigger!


Today's Fabulous Find...{Bless This Home} Frame w/Beadboard

Pin It!

7.25.2011

Featuring: Key Hook Decor

Ashley over at Shanty 2 Chic is the creative crafter behind this gorgeous piece.   There's so much to love about it:  the hooks, the bead board, the buckets, the dried hydrangea, the price...I could honestly go on and on!


Love it! Love it! 


Today's Fabulous Find...Key Hook Decor


Pin It!

7.20.2011

Burlap 'Bubble' Wreath Tutorial

I mentioned in the Decorative Aged Door: Before and After post, that I wanted a wreath for my 'new' door that was full, had a softness to it, and was neutral in color.  After searching the web for awhile with no luck finding what I had in mind, I remembered a wreath that I made back in the late 90's.   That was when the light came on in my head and I realized that I might be able to update the look by using burlap.  Long story short it's exactly what I was hoping for and I love how it looks on the door!


I wish I knew where the idea for the first bubble wreath originated (from the 80's or 90's?) to give credit, but I don't have a clue.   I'm a bit embarrassed to admit that I still have mine from the 90's.  It's been tucked away in a tote for years waiting to be re-made.  Obviously it hasn't been a top priority of mine.  I was really into hunter green and mauve back then, but I bet you couldn't tell. ; )

Original and Updated Versions
Note:  If you'd like to make a bubble wreath with a light-medium weight fabric, like the one on the left, you may need to run the pin through the sides of the fabric square as well as the corners.  Just run the pin around the edge like you are making a very large slip stitch.  Keep reading and you'll understand what I'm talking about. :)

Supplies Needed

1-10" foam wreath
(check your dollar store)

1 1/4 -1 1/2 yds. burlap, or other fabric

@100 pins with large heads
(You can use small headed pins for fabrics with a tighter weave. 
I used my old sewing pins and then bought a new package to replace them, now I have new pins for sewing.)

How to Make A Burlap Bubble Wreath
(I came up with a new way to fold and pin the squares that I think is easier and faster than how we pinned them back in the 90's.)


I used a white pin in the pictures to show where you will hold the fabric with your thumb and index finger when folding it.  You don't need to pin it until step five.

1. Cut your fabric into 4" x 4" squares (or close to that).   I cut one square first to make sure it was the size that I wanted and then used it as a guide to cut the rest of the squares.  

Cut the fabric into 4" strips and then cut each strip into 4" squares.  The squares don't need to be measured and cut precisely if you don't want to take the time, but should all be cut pretty close to the same size. 

2.  Fold the square in half to form a triangle.  Take the right hand corner (pinch one layer of the fabric on the very tip) and bring it to the front.  Line up the corners.

3.  Take the left hand corner (pinch one layer of fabric on the very tip) and take it to the back.  Line up the corners.

4.  All four corners should be lined up at the bottom.  It should look like a bubble now.

5.  Pin through all four layers of fabric.

6.  Pin the 'bubbles' to the wreath.  Pin one bubble on and then place the next one close to it so that it hides the pin on the one that you just added.  The bubbles should be just close enough so you don't see any of the foam wreath or the pins.


This pic of the back will give you a better idea of how it all goes together.  You'll want to bring the bubbles around the edge just far enough so when the wreath is against the glass/wall the green doesn't show from the side.  (You can cover the back with fabric first if you'd like.)


To give you an idea of how many it will take, I used just over 90 burlap squares for this wreath.


My sister had a great idea to use colored burlap (orange, red, brown) for the fall or (red, green) for Christmas.  Wouldn't that be fun?

Hopefully I've explained this so it all makes sense, but if you have any questions, please feel free to ask!   I was happy to learn through reading the comments on the decorative door post that I'm not alone in my readiness to bring back the bubble wreath.  Who knows, it might just happen!  I think it's time...do you? ; )

Updated to add:  You might also like these simple holiday additions to the burlap bubble wreath.

 Today's Fabulous Find...The Burlap Bubble Wreath


I'm linking up to these parties.  Click here to browse by the buttons.


All Thingz Related    Be Different Act Normal    Beyond The Picket Fence    Blue Cricket Design    Chic on a Shoestring Creation Corner   Creations By Kara
Designer Gardens    Dittle Dattle    Domestically Speaking    Embellishing Life Everyday   Finding Fabulous    Fingerprints On The Fridge
Funky Junk Interiors    House of Hepworths    I Heart Naptime    Just A Girl    Keeping It Simple
Serenity Now    Seven Thirty-Three    Sew Can Do    Sew Much Ado    Shanty 2 Chic   Sister's Stuff   Skip To My Lou
Someday Crafts    Somewhat Simple    Sugar Bee Crafts    Tator Tots and Jello    The Creative Crate    The DIY Showoff
The Girl Creative    The Shabby Chic Cottage    The Shabby Nest    Tip Junkie    Today's Creative Blog
Under The Table and Dreaming    Home is Where My Story Begins    The 36th Avenue  Craft Junkie Too

Pin It!

7.18.2011

Five Clicks to Your Own Favicon

Have you noticed that Blogger has added a new, simple way to add a favicon to your blog?  I only realized it was there when I was changing my blog design. 

Some of you might we wondering, what is a favicon?   This is Wikipedia's Definition.

The favicon for my blog is this little orange star next to my blogs name...


...and here on my sidebar in the 'fabulous sites' section. 
(Tip:  If you add your own blog to your blog list, you can check quickly to make sure your post published correctly.)


Now you can add a favicon to your own blog with five quick clicks.

1.  Click on 'design' in your Blogger menu.
2.  Click on 'edit'. 


This window will pop up. 


3.  Click on browse to choose your image.  (There is a limit on the size of picture you can use.  I made the image quite small before I saved it, see star image above.)
4.  Select an image from your computer.
5.  Click on save. 

It's really just as easy as that!  A favicon is a fun and simple way to add a little personality to your blog title.  Give it a try. :)

Today's Fabulous Find...my very own favicon. 


Pin It!

7.16.2011

Decorative Aged Door: Before and After

Last month I was visiting my parents and was just about ready to leave to go home, when I set my eyes on this 'weathered beauty' in a pile of my Dad's scrap wood (he keeps a stash for my sisters and I for crafts, he's great!).

This armoire door was already old and 'naturally weathered', but not really the weathered look I was going for.  My Dad was happy to let me have it and I was happy to take it because I had a vision in my mind of what I could do with this FREE door.


Pictures of the Process

I love the challenge of using items that I already have around my house, mostly leftovers from other projects, to make things as in-expensively as I can.  So what I have on hand influences the direction that I take on my projects.  Because I was able to use several items that I already had, I managed to turn this naturally weathered door...


into this faux aged door, and only spent an additional $8!  Love that!!!


I put together this vinyl quote three years ago (for a Ladies craft day at my church) to fit on a 12 inch tile and paid someone to professionally cut it, she charged $4 for it.  Since it never actually made it onto a tile, I cut the phrases apart and then spread them out to fit the space.


The glass door knob with iron plate was 50% off at Hobby Lobby, I ended up paying $5 for it.  I think I got a pretty great deal! 


The hinges were originally black, so I spray painted them red and then distressed them to look like the door knob plate.  I bought them at The Home Depot and paid less than $3 for the pair.


Now for the burlap wreath.  I wanted something full, soft, and neutral so I came up with an updated version of a 'bubble' wreath that I made in the 90's.  I used burlap from my stash and then attached it to the door with three lengths of sheer black ribbon that I had on hand and some hot glue. 


I'll show you how I made it next week.  (Added: Click here for the tutorial.)  All you do is cut a square of burlap, fold it into a bubble and then pin it onto a foam wreath.  I haven't seen any of these around recently, so I told my sisters that I'm going to make a move to bring back the bubble wreath (ha,ha).  What do you think, are you ready for it? :)

So one more time, a look at the before and after.


I'm really enjoying my new 'door' and had a lot of fun fixing it up.  It still catches my eye, but in a much different way now. :)

Today's Fabulous Find...new purpose for an old door.


Parties I link to.  Click here to view the party buttons.


All Thingz Related    Be Different Act Normal    Beyond The Picket Fence    Blue Cricket Design    Chic on a Shoestring Creation Corner
Designer Gardens    Dittle Dattle    Domestically Speaking    Embellishing Life Everyday    Finding Fabulous    Fingerprints On The Fridge
Funky Junk Interiors    House of Hepworths    I Heart Naptime    Just A Girl    Keeping It Simple
Serenity Now    Seven Thirty-Three    Sew Can Do    Sew Much Ado    Shanty 2 Chic    Skip To My Lou
Someday Crafts    Somewhat Simple    Sugar Bee Crafts    Tator Tots and Jello    The Creative Crate    The DIY Showoff
The Girl Creative    The Shabby Chic Cottage    The Shabby Nest   Thrifty Decor Chick   Tip Junkie    Today's Creative Blog
Under The Table and Dreaming    Home is Where My Story Begins


Pin It!

7.15.2011

New Blog Design and Buttons!

Last night I finally found the time (and the courage) to tackle those confusing html codes and changed over to a brand new blog design!  I've been working on this design off and on for several months now, so I can't tell you what a huge relief it is that it's finished and that I didn't cause any irreversible damage to my blog in the process, lol. :)  It makes me nervous! 

If you're reading this post in a reader or by e-mail, you can click here to see the new design.

I  made new buttons to match the new header too if you'd like one. :)

Update:  I've found that the button codes won't work when I publish them in a post, so please use the button codes on my sidebar, they are working great.  Thanks. :)

Today's Fabulous Finds

Today's Fabulous Finds

In case you can't remember, this is what the old design looked like. 


I'm still tweaking things here and there, so please excuse the mess if things look a bit out of place in the coming days.  I really hope that you all like the new look 'cause there's no turnin' back now. :)

 
Pin It!

7.13.2011

Featuring: How to Paint Laminate Furniture

Prepare yourself to be amazed...okay, are you ready?  Can you believe that Heather at DIY Kinda Girl turned this laminate furniture...


into this...
 

Amazing!!! 
 
If you have any laminate furniture around your home that you're not particularly loving, you might want to go visit Heather and learn more about how she did this.  I know I'm excited to give it a try!
 
One of the hardest things for me when starting a painting project is deciding which primer and paint to use when there are so many to choose from.  Heather will tell you exactly what you need to buy so there will be no confusion or expensive mistakes.  Click here for the tutorial.
 
A couple more links that you might find helpful:
 
 
Today's Fabulous Find...Painted Laminate Furniture 


Pin It!

7.11.2011

And the DISH Ran Away with the SPOON

Alison at Oopsey Daisy has a fun Summer Camp series where each Friday a guest blogger shares one of their favorite childrens books with some fun activities that go along with it.  This was my guest post on July 1st in case you missed it. :)

The book I chose is titled 'And the DISH Ran Away with the SPOON', by Janet Stevens and Susan Stevens Crummel.  It has such a fun storyline and endless possibilities for activities too!


Hey diddle diddle, the cat and the fiddle,
The cow jumped over the moon,
The little dog laughed to see such sport,
And the dish ran away with the spoon.

Every night the rhyme gets read.  Every night Dish and Spoon run away.  And Every night they return--until tonight!
Where can Dish and Spoon be?  The rhyme can't go on without them, so Cat, Cow, and Dog set out to search for their missing friends.  But where to start?  Should they go north?  East?  Northeast?  They'll just have to read Fork's map, ask directions, and try not to get lost in Little Boy Blue's haystack or under Miss Muffet's tuffet or in Big Bad Wolf's kitchen--
"FEE, FI, FO..."
Oh no.  Could that be the giant?
-forward from 'And the Dish Ran Away with the Spoon'


My kids and I (with my sister's help too) thought of some activities that you might enjoy that fit right along with the storyline of the book.  I suggest reading the book first, doing some of the activities throughout the week, and then reading the book again.  This time you'll have a map to follow and a fiddle to play!  We hope you have as much fun as we did!


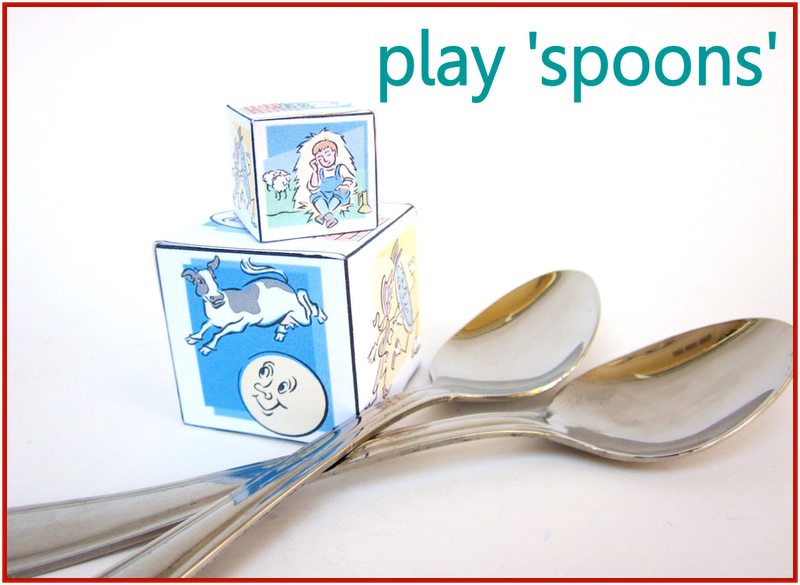
Directions:  Find a couple of boxes (or just one).  Trace around a small bowl or plate then cut out the circle.  Be sure to leave enough of the box so it will be strong enough to support the stretch of the rubber bands.  You can purchase a bag of rubber bands in assorted colors and sizes for around 50 cents.  Tape the two boxes together with duct or packing tape.

Decorate with stickers, glitter glue, paint, or markers if you'd like, or leave it plain like we did.  (Remember, it doesn't need to look pretty to be fun!)


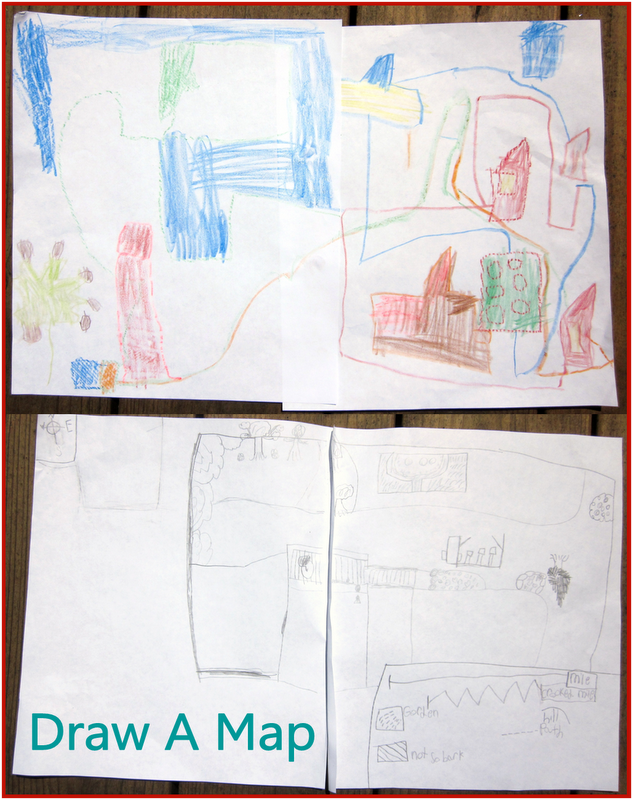
Take a few minutes to talk about the map in the book as you read.  What is a map key?  Why is it important?  Talk about how far the Dog, Cat, and Cow will need to travel before they reach their destination.


Have your children draw a map (with a key) of your home and yard or neighborhood.  They might even have fun following the map in search of a special treat!


This is a version that I came up with for younger children.  Older children could use a regular dice and grab for the spoons if a 1 or a 3 is rolled.


In the book, Dish falls from Jack's beanstalk and breaks into pieces everywhere.  They take Dish to the house that Jack built, who is a jack-of-all-trades and nimble and quick too!  He is also the person that puts Humpty-Dumpty back together again every day after he falls off of the wall, if anyone can fix Dish Jack can!


Make fruit pizza with kiwi, bananas, strawberries, blueberries, pineapple--whatever fruit you like.  Break 'Dish' into pieces and enjoy!


  • Act out the story:  Make stick puppets--draw the characters in the story, cut around them and glue them to a Popsicle stick, or use items from around the house and make simple costumes to wear.
  • Have a jumping contest:  Pretend you are jack jumping over the candlestick.
  • Print and color a picture of Humpty-Dumpty, cut it into a puzzle.
  • Have a relay race:  Race to the finish line carrying an egg on a spoon.
  • Make a spider:  Add black string licorice to a rice crispy treat for spider legs.
  • Play sheep/sheep/wolf instead of duck/duck/goose.
  • Draw a maze to get to the dish and the spoon.
  • Make Little Bo Peep's lamb:  Glue cotton balls to a picture of a lamb.
  • Plant a bean:  Grow your very own beanstalk!
  • Make a matching game:  Match the cow to the fiddle, the dish to the spoon, Little Boy Blue to the haystack, Jack to the candle, etc.
  • Color paper plates to look like 'Dish'.
 *There are so many nursery rhyme activities that you can do even if you don't have access to the book.

I think you'll really love this book!  Happy reading!


Pin It!

LinkWithin

Related Posts with Thumbnails